Inland nw routes |
|
|
|
|
PLEASE EVERYONE HAVING CAMPFIRES IS A HUGE RESPONSIBILITY.
SINCE 6.14.2024 I HAVE PUT OUT 3 SMOLDERING CAMPFIRES LEFT BY HIKERS/BACKPACKERS. PLEASE DO TWO THINGS FOR EACH HIKE, CAMPTRIP IF YOU MUST HAVE A CAMPFIRE, CARRY 5-8 PLASTIC GROCERY BAGS. THEY ONLY WEIGH 6 GRAMS PER BAG, AND COULD SAVE OUR FORESTS. USE THEM FOR CARRYING WATER TO EXTINGUISH YOUR FIRE.AND, IF YOU COME UPON A HOT CAMPFIRE, PLEASE USE THE BAGS TO CARRY WATER TO EXTINGUISH ANY HOT ASHES. THEY TEND TO RIP AFTER MANY LOADS, HENCE 5-8 BAGS. IT WOULD BE ASHAME TO SEE STEVENS LAKE LOOK LIKE, AFTER THE BIG BURN. Chic David InlandNWRoutes.com
0 Comments
Hi Hikers,
We are going to experience very hot, dry, and windy conditions. Please take all precautions to protect our lives and forests. I have come across two campsite fire pits that were not thoroughly extinguished. Carelessness can destroy our lives, forests, towns and much more. Please do your part, and be smart. You could be charged with neglect. Ps….PLEASE read the previous blog THANK YOU, Chic David InlandNWRoutes.com CAMPFIRES, AND YOUR RESPONSIBILITIES
There’s nothing like enjoying a campfire while camping out at your favorite lake. BUT, in the last three weeks I have found two campfires burning, and no one was around. Up at Upper Glidden Lakes, I hiked in to have dinner by the lake. During dinner, I noticed considerable trash laying about. After dinner as I was packing up to leave, I started picking up trash. As I reached for the trash in the fire pit, I felt the heat of a smoldering campfire. I dumped the trash out and ran down to the lake to get water to extinguish the ashes. It took three trips to the lake to put the fire out. Flash forward three weeks. While I was up at Upper Stevens Lake to assess the avalanche debris that has blocked the trail, I had my lunch next to the lake. There was a group of very polite young people, getting ready to head down the trail. I ate lunch with the always great views of the Stevens Peak massive. When I was done eating, I scanned the area for trash. There was very little to pick up. But then I started picking out unburned trash from the pit. And low and behold, the fire pit was smoldering hot. No I don’t know that it was left by the group of kids, but there was evidence that they tried to extinguish the fire, but did not finish the job. The moral of these stories is simple…..if you leave a fire, even smoldering, it can cause a fire that can destroy whole areas or forests. A single plastic grocery bag weighs only 6 grams. They can be used for trash pickup, dog and human poop removal, and for putting out fires, among many other uses. Because most grocery bags leak, they are perfect to transport water to the fire pit. All you have to do, is direct the leak onto the burning ashes. A plastic grocery bag can hold about 1.5 gallons of water. Even if it takes many trips to extinguish a fire, it’s worth the effort to save our natural wonders. So my advice to every hiker, paddler, backpacker, climber, camper, or Rv’er, is to carry many bags with you. They are light and can save entire forests from burning. The Stevens Peak and Lakes area are some of the best hiking, camping and scrambling areas around Spokane. This area last burned in 1923. It is filled with such beauty, it would be a shame to see it charred and wasted. While this BLOG is still on your mind, fold up 5 or 6 grocery bags, and put them in a ziplock for whatever use they are needed for. You too can be a hero. All you have to do is plan ahead. Thank you all for reading and using InlandNWRoutes.com, Chic David InlandNWRoutes.com On 6.14.24, I drove up to Upper Glidden Lake to have dinner by the lake.
The drive is way worse than the hike. Just take it slow. This hike starts a short distance from the Idaho Montana boarder, under some high voltage transmitting lines, east of Burke, Idaho. Trail#135 is only 1.2 miles in and has an elevation change of 191verts. Upon reaching the lake, I walked past several campsite, to get to the largest campsite. I took a few images, and sat down to eat my dinner. As I ate, I noticed that the previous campers/hikers left a mess around their campsite. When I was picking up assorted trash, I noticed that their campfire was still smoldering. I could feel the heat. The campers left their campfire burning, and it showed zero effort to extinguish it. I dumped my plastic grocery bag of trash out, and made several trips to the lake to get water. A grocery bag can be used for so many things. They tend to have holes in them, so they are great to extinguish a fire. However, on a return to the lake, I snagged my bag on a bush, hence it no longer could be use as a water bucket. So I headed out and stopped at the Shoshone County Sheriff’s office in Wallace, to alert them of the hazard. The sheriff’s office said they would contact the Idaho Department of Lands to handle the smoldering campfire. So, the moral of this story is simple. When you are in the mountains, take every precaution to assure that your campfire is dead out. And while you are at it, please clean up after yourself and others. It saddens me to think that people are so lazy and unprepared, that they can’t protect our forests. Plastic grocery bags can be used to pick up trash, pick up your dogs poop, extinguish fires, collect morels, organize your gear, and so much more, but not at the same time. Thank You for using InlandNWRoutes.com Chic David InlandNWRoutes.com EARLY SEASON HIKING
First know that this time of year is some of the best hiking. However, the sunny warm weather can fool us into thinking the high country is equally warm. Altho it is warmer, in the shade it can be much cooler. The other day at Lone Lake, as I was coming down, I came across a couple heading to the lake. They each had a small water bottle, half full, tennis shoes, tank top & T-shirt, and no other supplies or packs. (Ahead was a tenth of a mile trail washout, and 3-6 feet of snow. If the Spring, runoff is high, there is no way to keep dry. Creeks will flood your shoes/boots, foliage will get you clothes wet, and adverse weather can soak you to the bone, if you aren’t carrying appropriate gear. It will be near 90° on 6.8-9.24, but up at Lone Lake or any lake, the temps could be as low as 55-65°. If by chance the winds are up, let’s say it’s a moderate temperature, the windchill factor can lower the temps to uncomfortable levels. Even 5-10° cooler can chill you too much. HYPOTHERMIA is a condition that zaps the heat out of your body, and you may not even notice the change. Always observe yourself and your hiking partners for signs of Hypothermia. If they unzip their jackets, take off their gloves and caps, if they talk slow, or stumble while walking…STOP. Ask your other hiking partners, to assess the person. If they concur, act fast. You have very little time to help your friend(s). Get them bundled up. Put their gloves, caps, jackets on, and if you carry them, apply chemical body warmers to key arteries to warm them. Once in the American Selkirks on a hike to the Twins of the Seven Sisters, it was 92°. We stop in the shade of rocks for lunch. An odd storm blew in, and the temps drop about 25°. One girl on the hike, dressed in shorts, warm top, started going into Hypothermia. When the thunder started, she was cold. She thot the claps of thunder, were Bonners Ferry residents shooting artillery rounds at us. HYPOTHERMIA IS NO JOKE. Even on descent days, always carry what you need to get or stay warm. The below url will direct you to our MEDICAL INFORMATION section. https://www.inlandnwroutes.com/medical-information.html This section covers most of the weather related illnesses. An idea would be to take “screenshots” of the types of illnesses you may encounter. That wise, you have the tools to deal with hot, cold, or wet circumstances. As I have said many times….plan your trip in such a way, to be able to handle any conditions that pop up with you or your outing partners. That includes always having your 13 ESSENTIALS, handy. PLEASE…PLAN WELL AND BE PREPARED Chic David InlandNWRoutes.com BE PREPARED...BE SAFE
As Spring leads into Summer, more of us will be getting out to enjoy Nature. It is our personal responsibility to equip ourselves with all we need to know, like waiting out a storm, deal with an injury, or worse..spend the night out. Below are things we all need to know, and be able to use to help ourselves or others. PLANNING YOUR OUTING Number 1 is to call the Ranger District at least 3 days before your trip. Their phone numbers are listed on every write up. Nothing makes me upset, like driving for hours, to find a road or trail is closed. On our HOME PAGE, scroll down to the Managing Agencies Alerts. Tap on the url, of the area or forest you are planning to visit. Here you can access all the ALERTS. Please understand something. If you go into an area that the USFS has closed, jail time and/or fines may be in your future. 13 ESSENTIALS https://www.inlandnwroutes.com/13-essentials.html Click on this url to learn what EVERY hiker, biker, paddler, scrambler, climber, must have with them. PLEASE, make sure you have what you need to possibly spend the night or deal with any emergency that may arise. Especially blisters. WEATHER, THUNDERSTORMS AND LIGHTNING https://www.inlandnwroutes.com/weather-thunderstorms-and-lightning.html Click on the above url to learn how to prepare for all weather conditions. Be sure to check out the NOAA’s Hourly Weather Forecast. This graph will show you, if and when inclement weather will occur. With this detailed information, you can plan your outing to avoid bad weather circumstance. I have found that the timing in this graph is a bit more accurate than the quantity of precipitation. I personally like using an umbrella, more than bundling up and sweating too much. Because it isn’t summer yet, the temperatures can drop to near freezing as soon as the sun goes down. Carry with you, warm clothes, like stocking caps, warm gloves, extra socks, chemical hand warmers, fleece thermo layer, and a waterproof jacket and/or pants. The more comfortable you are, the better the chance of spending a night out. The very first section in WEATHER, THUNDERSTORMS, LIGHTNING, spells out how you can predict smoke plumes, winds, weather patterns, fire closures, and much more. Learn it and be safe. “ COTTON KILLS” Cotton clothes for around town, and in daily life, are a dream to wear. But in the mountains….”COTTON KILLS”. Unlike high tech base layers (polypropylene), that wick the moisture away from your body, cotton absorbs moisture and sweat, and eventually cools the body below safe levels. Once your core temperature drops too low, you will be unable to make good decisions and get warm again. In WEATHER….read about HYPOTHERMIA. HYPOTHERMIA is a silent killer. Know how to deal with it, and how you can save a person suffering from HYPOTHERMIA. David and I have created the following sections to better inform our readers, of what we need to do before, during and after, an outing. MEDICAL INFORMATION https://www.inlandnwroutes.com/medical-information.html TRAIL ETIQUETTE AND SKILLS https://www.inlandnwroutes.com/trail-etiquette-and-skills.html HINTS https://www.inlandnwroutes.com/hints.html Our goal at InlandNWRoutes.com, is not only to show our readers the incredible places to play in our region. We want all readers to be safe, have way toooo much fun in Nature, and return home with pictures, stories, and a BIG grin, from ear to ear. THANK YOU ALL for reading and using our website. Chic David InlandNWRoutes.com BLOG #61 FAMILY HIKES IN SPOKANE COUNTY
THE SPOKANE COUNTY CONSERVATIONS FUTURES PROPERTIES Thanks to Washington’s voters, back in the mid 90’s, they passed the Spokane County Conservation Futures Tax. Since then your 4 1/2 cents per 1000$ assessed value has bought, open spaces, rural properties, and important lands to preserve. There are currently 17 properties, that are in use every day. And more coming in the near future. Check out the Spokane County Parks website below. https://www.inlandnwroutes.com/spokane-county-conservation-futures.html The coolest thing about these properties, is the county can basically build a parking area with pit toilets, improve trails or create new trails, and remove dangerous structures. If you have young children, of any age, take them to one of these great trails, and share Nature. The more children are exposed to Nature, the more rounded and at peace they will be in life. Thank You for using our website. Chic David InlandNWRoutes.com We are very fortunate to live within 3-4 hours of some incredible hiking.
Below are in my opinion, the best of the best hikes shown on our website. One of my criteria is hiking in places where there aren’t many, if any other people. To achieve this, we provide OPTIONS. OPTIONS are hikes that take skills and off trail navigation. They should only be done by knowledgeable and capable enthusiasts. Click on the associated url’s to see my write ups on each hike. If you have specific questions about an area here or on our website, please feel free to contact me. At the bottom of every page is my email envelope. But do remember, I am often out doing research or enjoying these wonderful places. Contact me 2-3 days ahead of your hike, or call the Ranger district 3 days before every hike for more info. WASHINGTON SCABS WASHINGTON SCABLANDS. (WS) When the great Glacier Lake Missoula let loose, it scoured over 1,000 feet off the surface of the land. But it also left many beautiful areas to explore. The wildflowers in March thru April are sure to please. This is a desert, so use all mesas, rock formations, and creeks to navigate. If you find yourself misplaced, do back to the last spot you knew where you were at, and consult your map. ESCURE RANCH & TOWELL FALLS https://www.inlandnwroutes.com/escure-ranch.html This old farming road leads to two waterfalls, with one additional early in the season. It’s on an old cattle and sheep ranch. Do not miss walking over to the homestead. The guy who built this ranch, built the building to be around in for hundreds of years. PALOUSE FALLS https://www.inlandnwroutes.com/palouse-falls-state-park-heritage-site.html This State Park offers incredible views of the 198 foot Palouse Falls.There are several viewing areas to see Washington State’s Official Waterfall. BE AWARE…people have died falling off the uncontrolled overlooks. On YouTube search Palouse falls kayaker. HOG CANYON FALLS https://www.inlandnwroutes.com/hog-canyon--falls.html This short walk goes out to a seven step waterfall, carved out of the rock, that is very photographic. Easy walk. NORTHRUP CANYON & STEAMBOAT ROCK https://www.inlandnwroutes.com/northrup-canyon.html Northrup Canyon leads to an old homestead and on to Northrup Lake. It is steeped in history, from the building of the Grand Coulee Dam. Near the start of the road/trail, look to your left for massive amounts of discarded tin cans. Above them was a mess hall for the construction workers. SINCE WE ARE EXPERIENCING SOME GREAT NORTHERN LIGHT, I THOT ID SHOW OUR READERS WHERE THE COLORS ORIGINATE FROM AND MORE. ENJOY Ps....In the mid 80's, I was the President of the Spokane Astronomical Society, as well as the guest speaker for our grade schools convocations and in the field Star Parties. Pss....once, back in 2001, I was rowing Swiftcurrent Lake, and camping along its shorelines. As I paddled I noticed a lot of large critters making noise all along the shoreline. I decided not to sleep on a beach that night, so I set up my cot in the rowboat, and crashed. The critter noise got real loud, so I thru back my boom tarp (think sailboat), and to my amazement, the entire sky from horizon to horizon, was fire engine red. Now I'm not saying a strip or two. I mean the whole sky was bright red. Because there was a breeze, none of my images turned out. Drats! WHAT ARE THE NORTHERN LIGHTS?THE NORTHERN LIGHTS, COMMONLY REFERRED TO AS THE AURORA BOREALIS, ARE THE RESULT OF INTERACTIONS BETWEEN THE SUN AND EARTH'S OUTER ATMOSPHERE. THEY ARE ONE OF THE MOST SPECTACULAR LIGHT SHOWS TO WATCH AS VIVID COLORS GLOW IN THE SKY. IN THE SOUTHERN HEMISPHERE, IT IS CALLED THE AURORA AUSTRALIS.WHAT CAUSES THE AURORAS? MOST AURORAS OCCUR IN RESPONSE TO ENERGETIC PARTICLES FROM A SOLAR STORM, WHICH CAUSE THE GASES OF THE THIN UPPER ATMOSPHERE TO GLOW. THEY TAKE PLACE AT HEIGHTS BETWEEN 50 TO 100 MILES ABOVE THE EARTH. THE AURORA CAN LAST ANYWHERE BETWEEN A FEW MINUTES TO SEVERAL HOURS. AURORAS ARE MOST COMMON IN POLAR REGIONS. THE VARIOUS COLORS, OF WHICH GREEN AND RED PREDOMINATE, ARE THE RESULTS OF VARIOUS LIGHT EMISSIONS FROM OXYGEN AND NITROGEN GASES BEING ENERGIZED BY THE SOLAR PARTICLES. WHAT ARE CREPUSCULAR RAYS?CREPUSCULAR RAYS ARE A BANDS OF SUNLIGHT SHINING THROUGH BREAKS IN CLOUDS ON THE HORIZON. 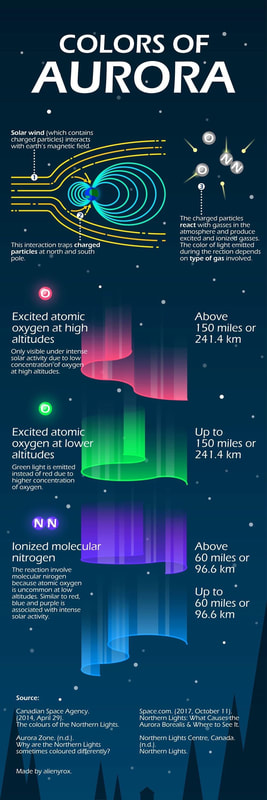 We are very fortunate to live within 3-4 hours of some incredible hiking. Below are in my opinion, the best of the best hikes shown on our website. One of my criteria is hiking in places where there aren’t many, if any other people. To achieve this, we provide OPTIONS. OPTIONS are hikes that take skills and off trail navigation. They should only be done by knowledgeable and capable enthusiasts. Click on the associated url’s to see my write ups on each hike. If you have specific questions about an area here or on our website, please feel free to contact me. At the bottom of every page is my email envelope. But do remember, I am often out doing research or enjoying these wonderful places. Contact me 2-3 days ahead of your hike, or call the Ranger district 3 days before every hike for more info PROPOSED SCOTCHMEN PEAKS WILDERNESS. (PSPW)
For over 20 years, the Friends of Scotchman Peak, have worked to put this area into the National Wilderness System. This whole area is rough to get to its summits, but so worth every bit of effort. ROSS CREEK CEDARS https://www.inlandnwroutes.com/ross-creek-cedars1.html Altho it isn’t officially in the PSPW, it is a national treasure. Western Red Cedars are 8 feet in diameter and up to 150 feet tall and over 1,000 years old. It’s only a .7 mile loop, but has an extended trail (142) the the west, to get away from the crowds. The extended trail is in a much more primitive area. South Fork Ross Creek Falls is off the extended trail. Look for the elusive Pine Marten, up Trail #142. SCOTCHMANS PEAK https://www.inlandnwroutes.com/scotchmans-peak.html This peak tends to be a test piece for up and coming hikers. The views all around are great. But to the NE is the CMW. To the far west you see the American Selkirks. Be aware of the Mountain Goats? They may be aggressive. STAR PEAK https://www.inlandnwroutes.com/star-peak1.html As you are driving east on Hwy 200, Star Peak sticks out on the southern end of the Proposed Wilderness. Look for the lookout tower on top of the pyramid shaped peak. This hike is 4.72 miles with 3910 feet gain. It’s not easy, but offers rarely seen views. The outhouse for the tower is class A. LITTLE SPAR LAKE & HORSESHOE POND DO NOT MISS THIS HIKE/CHICWACK https://www.inlandnwroutes.com/spar-peak-little-spar-lake--horseshoe-pond.html It’s a moderate hike to L.S.L. but the mile long cliff that the trail follows are spectacular. The lake is lined with cliffs on the NE side. Have a healthy snack here, and hold lunch til at the pond. From the lake, if you chicwack straight up for about .5 miles, the forest opens up. Here you turn left and walk to where you see the pond to the NW. Save your lunch for the peninsula. |
AuthorWe would like to engage our users so we have started this blog so that we can interact with you. Please do not hesitate to comment on our posts if you have questions or things to add. Archives
July 2024
Categories |

|

|
 RSS Feed