HINTS
CHECK OUT OUR NEW BLOG SECTION FOR ADDITIONAL INFO & IDEAS.
FOR FURTHER READNG, CHECK OUT THE BELOW URL.
https://mra.org/wp-content/uploads/2016/05/backcountrysafety.pdf
.
j
13 ESSENTIALS
THIS SECTION IS EXTREMELY IMPORTANT...... IF YOU DON’T GET ANYTHING OUT OF THIS SITE. HEED THIS SECTION.
THE 13 essentials have a drop down menu page.
PLEASE, make up a complete essentials pouch for every person in your family, and make sure each companion has them, and knows how to use them.
Earlier in the winter of 2021, a father and daughter went to the Cabinet Mountain Wilderness, for a day of backcountry skiing on Engle Peak.
The father was on a cornice when it broke off, sending him sliding down the mountain. He and his daughter got separated. They spent the night out about 600 feet apart, but didn’t know it.
The father, had most all the food and emergency supplies. They both survived, but the daughter spent a terrible night alone on a mountain.
Or, what if you are separated and you puncture your leg or arm. And the other hiking partner has the First Aid Kit?
Each person must be responsible for his or her safety and care.
If one has only a half bottle of water and a candy bar, their chances are poor to survive a night out, especially in the early spring, late fall and winter.
But it can get cold even in the summer.
This also applies to all food, snacks, and water.. If you carry the supplies for your spouse, and you find yourself unfound, what are they going to do.
Its really simple,
13+ ESSENTIALS
These item are to be carried by EVERY INDIVIDUAL, whether hiking solo or in a group. Couples are especially encouraged to carry their own 13 essentials, as well as their own food, water, and first aid supplies, just in case one or the other gets separated from their spouse or group.
PLEASE, ERROR ON THE SIDE OF CAUTION.
NEVER rely on others. And know your equipment inside and out, before venturing into nature.
KNOWLEDGE is the most important thing you can take into the mountains.
Benefits Franklin once said…
“IF YOU FAIL TO PLAN, YOU ARE PLANNING TO FAIL”
WAYS TO TELL DIRECTIONS
NORTH STAR
At night, if the sky’s are clear, locate the Big Dipper. Go to the cup of the dipper, and find the two stars furthest away from the handle. From the bottom star, draw a line up past the upper star. Continue up to the Little Dipper. The first star is the North Star.
SUN AND STICK METHOD
If the sun is out, pound a stick in the dirt/snow, and place a marker at the top of the stick’s shadow.
Wait 15+ minutes and place a marker at the top of the sticks shadow.
Draw a line from one marker to the next. These two markers are west on the left to east on the right.
Now draw a line perpendicular to the west-east line. North is above, and south is below.
USING A WATCH
If you have a digital watch, pretend it’s a dial watch.
Place the hour hand at the sun.
Go to the minute hand, and then find a line between the two hands.
South is half way between the two hands, and north is in the opposite direction.
FLOATING MAGNETIC METAL
First, find a pond or even a cup of water.
Next take a small paper clip and rub it on another larger piece of metal, to magnetize the paper clip.
Set the paper clip on a leaf, styrofoam, small wood block.
Let it set for a while, out of the wind.
The paper clip will eventually point to magnetic north.
Know the area you are in, and observe the True North from the Magnetic North.
Or to make all this easy….dig out your compass. It will never fail you.
I have, attached to my pack strap a small thermometer and compass, for easy access.
However, the compass arm may be affected by any magnetized metal close by.
Isolate the small compass to determine what way is north.
ARE YOU DIRECTIONALLY CHALLENGED.
A few people have the ability know what direction north is at the drop of a hat. But most don’t.
An easy way to instantly find the North Pole, is to train yourself and your hiking/skiing partner, way before you head out into Nature.
Do this, by often asking your partner to point to the north. Or east, west, or south.
When you ask your partner what direction is east is, for instance, your partner should point to the direction without too much thot.
This method should be practiced often, so you know your partner can tell direction.
GOOGLE EARTH
As a backup, I screenshot images of my route both vertical and horizontal. By using two fingers on the screen, pull down, and the perspective will be horizontal.
Write notes on your phone for reference in the route and turns you need to take.
The more info and maps each person has, increases the odds on surviving a separation or being lost, I mean unfound. I try never to be lost. I said tried!
CLOTHING
Clothing is a critical issue for anyone going into nature. If you don’t dress appropriately, you will pay a price. The following information is meant to show you the best, least expensive way of dressing yourself for success on the trail.
First and MOST IMPORTANT...”COTTON KILLS” in the mountains. I love my soft cotton shirts and other clothing while around the house or town, but I never wear cotton in the mountains. Cotton tends to soak up sweat as you work thru tough hikes. Then you are wet. If the weather changes or you go deep into the woods, your bodies core temps can drop to dangerous levels.
Below are some suggestions that have worked for me over the last many decades. They may or may not work for you. And that’s okay.
BASE LAYERS
The base layer is worn next to your skin, and is designed to wick any moisture away from your body.
There are so many options when choosing a base layer. The way you decide, is to try a brand out. If it works, buy it. If it doesn’t, keep researching options until you find a product that works for you.
All major manufactures make state of the art base layers. But that isn’t to say they are the best for you.
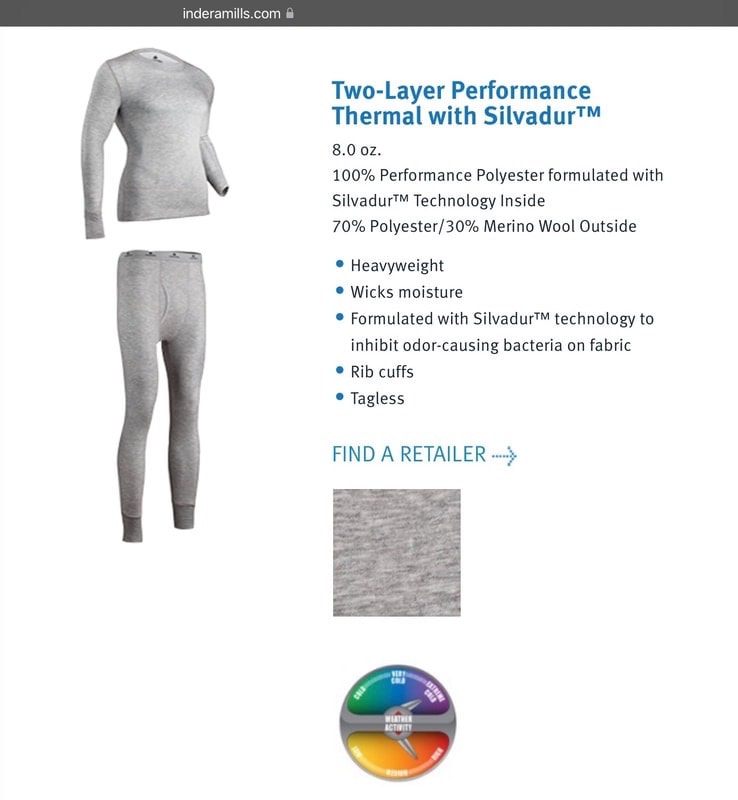
For those wanting warmth and wicking capabilities, I’d suggest Indera Two Layer Pro, SEE BOTTOM.
I’ve skied for 64 years and have found nothing to match the Indera Two Layer tops and bottoms. The inside is polypropylene, while the outer layer is Moreno wool.
If I have one gripe about the Indera, it is that the waist band deteriorates after a lot of washing. But for about 22$ per piece, it’s a great buy and works well.
To repair the waist band, fold a small amount together on both sides, while wearing them. Once they feel snug, take them off and sew the folds together.
I always buy a size larger than needed. That wise, it creates more loft. More loft means warmer bodies.
THERMO LAYER
The next layer is the thermo layer. The thermo layer is designed to keep you warm. They come in weights like 200 grams or higher. The thicker the fleece weight, the warmer the garment. For those on a budget, look for an off brand within your budget.
In late fall or winter, the mountain temperatures can get chilly. I always carry my down jacket for breaks, lunch or any time I’m cold.
OUTER LAYER
Your outer layer is designed to not necessarily only keep you warm, but dry.
Do not scrimp on your outer layer. They should have features like a hood with a draw string to fit your head snuggly, removable hood, and a small sun visor. Other important features are a powder skirt to keep the snow out, pit zips to cool our self ( the larger the better), easy open and close pockets, and completely waterproof. Look below for washing and treating.
WOOL
Wool has been used by people for centuries. It’s biggest plus, is when it’s wet, it’s still warm. Secondly, it very inexpensive, as apposed to the high tech fabrics. Don’t disregard the importance of wool.
PREASURE BREATHING
Pressure breathing is a way of breathing that allows more oxygen into your blood stream. As you are approaching a steeper section of a trail, inhale deeply. Then purse your lips like you would do if you were blowing out a candle at arms length. Blow steadily thru your restricted lips. By the time you reach the summit, you will understand why pressure breathing is important to know. In the winter, it makes you feel warmer.
On lower angle slopes, you don't need to restrict your exhale as much as on steep slopes. Change your exhale to meet your circumstances.
CAMERA
A camera with fully charged batteries and lots of memory, can be a useful tool. I have used my camera to shoot back at trail intersections or Y’s to make sure I don’t miss key turn offs, upon returning.
I also carry a dozen 18” lengths of bright pink surveyors tape. I loop the tape over a branch, then pull the ends thru th loop. This allows me to easily retrieve the tape as I walk past it. Do not tie the tape. Future hikers may think its the way to go. and it may not apply to them.
Also, if you are going off trail, take an image of the direction and area you are headed. Once you get way over there, it just doesn’t look like it did from way back there. An image may be useful in choosing the route you need to go.
I use screen shots of goggle maps. I draw the proposed route, and use them to understand my surroundings in the field.
You can shoot vertical and horizontal images of the route, and refer to them on your phone.
Having said this...DO NOT FAIL TO TAKE A FOREST MAP & TOPO MAP, AND A FMPASS, ON EACH TRIP. BATTERIES DIE.
RESPONSIBLE PERSON
Tell your responsible person where you are going & when to call the sheriff if you are overdue. If you change your destination, make sure your responsible person knows where your new destination is. If you don’t, you run the chance of not being found in a timely manor.
And make sure your call or text to your responsible person is received.
We have included on each trip write up, the Sheriff’s phone numbers for that particular hike.
And please remember, if you call a sheriffs office, they may ask for a photo of the person. The picture needs to be a face on shot, without glasses or hats.
The reason you call the sheriff is in case of an EMERGENCY. Please don’t waste their time and resources, if it’s not an emergency.
MISCELLANEOUS
BUGS AND INSECTS
While on backpacking trip or around a campfire, you can find old rotting wood (from long downed and rotting trees), and set them smoldering.
Place these chunks of wood on rocks around your area to repel bugs and insects.
BE EXTRA CAREFUL NOT TO IGNITE SURROUNDING DRY FUEL.
HEADLIGHT
-Types of headlights. Now a days, we have LED and LCD headlamps to show our way. There is, however, a new type of headlight to consider. A (Circuit On Board) COB headlamp, scatters the light and allows for more depth of field as you walk. I carry one of each with extra batteries, on every outing.
THIS IS MY OPINION. YOU MAY NOT AGREE, AND THATS OKAY.
What would you do, if you were on an extended hike, and it gets dark, and your batteries die. Obviously, you would replace them.
But many outlets and online stores are selling rechargeable headlights.
What do you do if the lithium batteries die?
I know a lot of you are younger hikers, and use electronics in the woods.
Like electronic compasses, rechargeable headlights are not your only option.
Old school items tend not to be a better choice. You can change out the batteries.
FIRST AID
-First Aid Kit are a must for EVERY participant. If you get separated from your group and gouge you leg, you will need your own FIRST AID KIT. They should include a variety of band-aids, compression bandages, antiseptic creams, butterfly bandages, alcohol wipes, gauze wraps, Conan wraps, hand sanitizer, and feminine hygiene pads (even if you are a guy), to name a few, are a must.
“SPENCO 2nd SKINS BURN PADS” by Spenco are a must. If a heel feels hot, STOP Immediately, clean the area with an alcohol wipe and apply a Second Skin Burn Pad. I prefer the type you have to cut to size, as apposed to the patches. After cleaning the area, cut to size and apply as directed. I carry athletic tape to secure the 2nd Skins. You will be amazed at how well this product works, and your ability to get up and walk away without pain. I also carry several different types of Coban’s self adhesive wraps for a verity of needs. I found a long version at the Dollar Tree store fir $1.25.
Whatever you decide to carry, practice placement and proper cleanliness, so you know how to properly treat an injury.
Im not a fan of Ace bandages. If they are applied too tight, you could restrict blood flow.
PLEASE don’t stab yourself at home to make it real!
It is imperative to change out old or used supplies for new items. Nothing is more frustrating than to need an item you are out of. If anything gets wet or dirty, toss it out and resupply your First Aid Kit. Always pick up your bandage papers and wipes before you leave the area.
After stabilizing a victim, do a care analysis of the victim. Ask where their pain is, it’s intensity level, and visually examine.
A good rule of thumb is D.O.T.S.
D- DEFORMATION of extremities, spine, neck, hips, arms and legs.
O-OPEN WOUNDS. Trea for bleeding immediately. Other than a pulse and breathe in, controlling bleeding is essential..
T-TENDERNESS. Check the victim very carefully. Examine any areas of tenderness for additional injuries.
S-SWEELING. While checking for tenderness, take note of any area that shows any degree of swelling.
There is an online CPR and First Aid Course, you can take.
Log onto…..cprandfirstaid.net
The more you know, could just save a life.
METHODS TO START A FIRE
Always carry waterproof matches, extra lighters.
The more you have with you, the better off you will be, in case of an emergency
There are waterproof, windproof, lighters that will work in altitude.
Of these, there are some that are rechargeable.
They are great because they done use fuel. However, batteries die.
If you rely on these, carry a power stick to recharge as needed.
So always have a many lighters or other forms of fire starters as back ups.
I always carry several ziplock bags with folded paper towels, for many uses.
The most important is of course, toilet paper.
The next important reason is to use the paper towels to start the fire with.
WINTER AND COLD TEMPS
If you recreate in cold weather, including winter, you will be wise to carry a road flair or two.
They burn at about 1500° or more, and can start even wet wood on fire.
TINDER
In Nature there is a lot of flammable stuff to find and use to start your fire. All must be dryish.
Pine Needles
River Birch bark
Cattails….twist the cattail to expose the the stringy fibers inside
Most any thistle. But be ware, thistles are a pain
Cedar Bark, cut up or scrape for fine fire strarter
Dried orange peels
Potato and/or corn chips
Most all tree bark
Dry grasses
Beard Lichen is the dry stringy material that hangs down off of tree limbs
MAKING TINDER
Everyone should have a knife with them. Hold the knife perpendicular to a stick of wood, and shave downward, but not off the stick. This will make a bundle of shavings that will be easier to on fire.
Using your knife, shave a stick like you do to when sharpen a pencil. Gather the shavings and place them near where you want to start the fire.
Continue slicing any wood you find into several different sizes of tinder.
The more you make, the better
Build a log cabin style of tinder, that you can add the first small burning tinder to.
HOW TO BUILD A FIRE STRUCTURE
There are several ways to build your fire structure.
Gather a lot of different sizes of tinder and fire wood, and place them near the spot you want to build your fire.
A TEPEE STRUCTURE
Start by placing the small dry tinder in a mound.
Some dry leaves can be place between your hands. Rub your hands together with the leaves in them. Soon you will have a lot of small dry tinder to use.
Then stack slightly larger tinder in the shape of a tepee. Leave a small hole near the base of the tepee, to place the burning tinder in.
Add larger sticks to the outside of the tepee until you have a lot of wood around the tepee.
Be sure to leave enough space in the wood structure to allow proper air flow.
When you have gathered a lot of material to burn, light your small tinder on fire and place it inside the tepee.
Add larger tinder and wood as the fire starts burning the tepee.
LOG CABIN STRUCTURE
As the title suggest, build a log cabin of medium size tinder.
Then do all the steps above in the TEPEE STRUCTURE.
A RAFT STRUCTURE
Build a square or rectangular structure out of any material laying around. The structure can be made of rocks.
The advantage of using rocks, is they get hot and radiate heat.
Then do all the steps above in the TEPEE STRUCTURE.
Store bought and homemade fire starters
Vaseline and cotton or lint. Mix together in a bowl, but make sure some cotton or lint isn’t saturated with Vaseline.
Pack tightly in a light weight can.
Twine can be spooled and use to start fires.
A 9 volt battery and steel wool. Have your tinder built and ready. When the steel wool starts to burn, get it to the tinder fast.
A magnifying glass can be used to start a fire, as well as reading small print on a map, or used to remove splinters.
In an egg carton, pack each indentation with dryer lint. Then light a candle and drip the hot wax onto the lint. Mix together and let set up. Pop them out of the egg carton and store in a ziplock, inside a small can.
A BOW FIRE HAND DRILL
Items you will need.Twine, rope, or shoe lace
Knife 6"
Find a 2" diameter bowed (arched) shape branch about 2-3 feet long. Tie the cord to each end to look like a bow (bow & Arrow).
Find a dry 2' diameter stick, and carve one end into a point.
Find a piece of wood that you can split with your knife, and dig a 1' diameter divot into the the wood close to the edge, then cut a slot out of the edge.
Wrap the cord around the pointed stick, and place the pointed stick into the divot.
Have ready some small dry kindling, atop a piece of dry wood.
Place the upper part of the stick against your knee for stability.
Use the bow to rotate the stick in the hole. Soon the pointed stick will start to smolder. Blow on the smoldering wood to fan the fire.
Once the kindling starts to burn, sweep it off onto the kindling. Blow on it to fan the flames.
This method may take some time if you can"t find dry wood.
If the tree branches around you have stringy moss hanging off the branches, use it as kindling.
OTHER METHODS
There are commercial fire pastes, fire sticks that look like fat matches with strickers.
Make up a small tin of dryer lint saturated with vaseline
On winter hikes, take a road flare. They burn at 1500° or more, and can start wet wood on fire.
I always carry several ziplock bags for table napkins, paper hand towels, toilet paper, etc. They can be used for many needs.
You can use the 6" knife and a small 16", 3" diameter branch to chop wood.
Place some wood on a rock vertically, and your knife blade down on top of the wood.
Holding your knife steady, use the branch to pound the knife down thru the wood. The smaller the kindling the easier to start.
As stated above, if the tree branches have stringy lichen hanging from its branches, called Beard Lichen , collect a lot of it to use as "kindling" starter.
You also can pull bark off a tree, and use the driest wood inside as starter.
Use your imagination to create and carry what you may need in an emergency.
Start by sticking a long piece of kindling into the ground above your tinder at about a 30-degree angle, with the other end of the stick pointing into the wind. Then lean smaller pieces of kindling against both sides of the longer piece to build a tent. As the kindling catches fire add more kindling, followed by your firewood.
A log cabin design, pyramid, teepee, and a lean-to, is a good structure to build a fire.
USING WATER TO START A FIRE
Another method of making fire, is to use water. What you say? How can I use water to make a fire?
I always carry an assortment of ziplock bags in my pack, for multiple uses.
Fill a ziplock about 1/3rd full of water, and twist the ziplock so the water is in a corner of the baggie.
Collect an assortment of twigs, Beard Lichen, and any other flammable material, and create a teepee, lean-to, or log cabin design of tinder.
Hold the water filled baggie above the tinder, and let the sun magnify the heat that is created.
Soon the light tinder will start to burn. Place the burning material under your tinder, and you have fire.
USING A WATER BOTTLE TO START A FIRE
If you have a clear water bottle, fill it to the brim and cap it.
As the sun shines thru the bottle, notice an area opposite the sun that is bright white on the ground.
Tip the bottle to maximize the amount of area the sun shines on.
Use whatever tinder is available, by stacking it up. Have several different sizes of tinder available so you can add to the tinder once it starts on fire.
Once tinder starts to burn, add the next smallest size tinder. Then add larger size tinder until you have a fire.
FLINT AND STEEL STRIKERS
Flint and Steel strikers work very well to start fires. before you go out on a hike, practice how to use them.
Use an eye glass lens and the sun to start a fire.
FIRE STARTER
Listed below are types of fire starters, but the following can help getting damp or wet woods to light. In a forest, there usually is the light green or black stringy moss that hangs from tree branches, called Beard Lichen. Not only does it make a good fire starter, it can be used like a sponge to collect water.
Solid fuel fire starter. Some look like thick matches.
Magnesium Fire Strikers do well if they are dry.
Fire Starter Pastes are another option.
PACK IT IN- PACK IT OUT.
The USFS does not have the staff or time to clean up the many trails and campsites within their districts. Please clean up after yourself and others if needed. And please remember, aluminum foil and glass DO NOT BURN. Please pack them out.
-An old saying goes...”if you can carry it in full, you can certainly carry it out empty.”
LEAVE NO TRACE.
As states and the USFS don’t have the staff to clean up after you. Please clean up your, and others messes.
Leave No Trace principles can be learned from any Forest Ranger Station.
FREEZE DRIED FOOD MANUFACTURERS
On a recent trip up near Priest Lake, we noticed that if you let the pouch sit for over 15 minutes, the freeze dried meals taste much better.
The following are companies that make freeze dried meals for hiking and backpacking, with a twist.
I would like to invite you to tell us about your experience and taste of the foods listed below. Contact Chic thru this website.
Recently we realized that after you pour your boiling water into the food pouch, seal it and let it sit for about for a total of 20+ minutes.
This tends to soften the freeze dried food more and mixes the flavors better
heather’s choice.com
bushkaskitchen.com
fernwehfoodco.com
gourmetkickz.com
heatherschoice.com
nomadnutrition.co
outdoorherbivore.com
packitgourmet.com
trailtopia.com
mountainhouse.com
maryjanesfarms
backpackerspantry.com
patagoniaprovisions.com
rightontrek.com/meals/store
If you have any suggestions on the above topics, please use our contact form. When I include it in this section, I will credit you for your advise.
j
13 ESSENTIALS
THIS SECTION IS EXTREMELY IMPORTANT...... IF YOU DON’T GET ANYTHING OUT OF THIS SITE. HEED THIS SECTION.
THE 13 essentials have a drop down menu page.
PLEASE, make up a complete essentials pouch for every person in your family, and make sure each companion has them, and knows how to use them.
Earlier in the winter of 2021, a father and daughter went to the Cabinet Mountain Wilderness, for a day of backcountry skiing on Engle Peak.
The father was on a cornice when it broke off, sending him sliding down the mountain. He and his daughter got separated. They spent the night out about 600 feet apart, but didn’t know it.
The father, had most all the food and emergency supplies. They both survived, but the daughter spent a terrible night alone on a mountain.
Or, what if you are separated and you puncture your leg or arm. And the other hiking partner has the First Aid Kit?
Each person must be responsible for his or her safety and care.
If one has only a half bottle of water and a candy bar, their chances are poor to survive a night out, especially in the early spring, late fall and winter.
But it can get cold even in the summer.
This also applies to all food, snacks, and water.. If you carry the supplies for your spouse, and you find yourself unfound, what are they going to do.
Its really simple,
13+ ESSENTIALS
These item are to be carried by EVERY INDIVIDUAL, whether hiking solo or in a group. Couples are especially encouraged to carry their own 13 essentials, as well as their own food, water, and first aid supplies, just in case one or the other gets separated from their spouse or group.
PLEASE, ERROR ON THE SIDE OF CAUTION.
NEVER rely on others. And know your equipment inside and out, before venturing into nature.
KNOWLEDGE is the most important thing you can take into the mountains.
- FIRE STARTER.
- Waterproof matches, lighters, small road flares (for winter conditions).
There are commercial pastes, matches, and other types of fire starters on the market. - When in nature, you may notice the stringy lichen hanging from tree limbs. Beard lichen is an excellent fire starter, and can be used as a sponge for collecting water.
- Another use for something we all have around the house is dryer lint. Wrap it in paper like a tube, in a ziplock baggie, or stuff into an extra light container. Keep them in your 13 essentials for emergency use. See “HINTS”
- RAIN GEAR, UMBRELLA, PONCHO.
- It is essential that you stay as dry as possible. Rain suits tend to be too hot, while ponchos have more breathing ability. An umbrella is my choice for any hike that may be raining or snowing. Always carry a large lawn bag with many paper towels folded up.
- The lawn bag can be used as rain gear, and weights very little.
- MAP & COMPASS...GPS
- These items are useful tools
- . A GPS IS NOT A REPLACEMENT FOR A MAP & COMPASS, and the knowledge to use them. Batteries die, but maps stay operational. Always have a copy of the National Forest Map, and topo map to the area you are hiking. A National Forest map, and a topo map are important for each member of the outing to have in case of separation or adverse weather conditions. They can be copies in a ziplock bag.
- If nothing else, PLEASE make a copy of the area you will be visiting, for each hiking partner.
- You must calibrate your watch that has a compass built into it, as well as your GPS.
- EXTRA FOOD.
- Always carry extra food, maybe in the form of energy bars, but always high in protein. Choose an energy bar that does not require a lot of water to digest. Change out often.
- A way to tell if your energy/protein bars are a good choice, is to look at the carbohydrates in the bar. Then look at the proteins. The proteins should be higher then the carbs.
- My choice is a MET RX bar. They are available in the pharmacy at Walmart. They have 32 grams of protein and 18 vitamins and minerals.
- EXTRA WATER OR WATER PURIFIER
- Becausevwater is not always available along some trails, carrying enough water is paramount. I often drop water bottles along an out and back route, so I don’t have to carry so much water the full distance. Mark location carefully. See “HINTS”
- EXTRA CLOTHING
- Socks come to mind as an important item to have in case your feet get wet. A micro-fiber cloth works well and dries quickly. Other items may include polar fleece jacket and/or pants, spare wool or fleece gloves, stocking caps, and face masks. See “HINTS”
- In the winter, I carry a Road Flare. They burn at 1500+°, and can start wet wood.
- PAPER TOWELS & TROWEL
- I suggest paper towels over toilet paper, because a blow is very messy. The USFS suggests that all human waste be buried at least 6 inches deep, AND AT LEAST 200 FEET FROM ANY WATER SOURCE. THAT INCLUES PEE.
- I carry several ziplock bags of paper towels in my pack. They are light, and can be of great value, if needed.
- SHELTER
- A piece of plastic sheeting and twine will suffice for a shelter if needed. However, a very light bivy tent is a good choice. There are other options to consider.
- HEADLIGHT & EXTRA BATTERIES
- I date my batteries when I install them in my headlight. Modern LED/LCD/COB headlights don’t need spare bulbs, so a second headlight is advised. Check the batteries before every trip to make sure you will have light when needed.
A COB type of headlight floods the view with way more lumens , hence I've noticed that depth of field and obstacles awareness is improved substantially. See “HINTS” - KNIFE
- I carry several sizes of knives. One for small work like cutting up apples, but a large one if I’m on a potential difficult hike. A large Bowie type knife can be used to make kindling. See “HINTS”
- FIRST AID KIT
- You must decide what you take with you. Be extra careful in your selection of proper First Aid supplies.
- Remember, you are responsible for yourself.
- Carry what you may need, and add as necessary. Feminine pads are great items to have in your first aid kit.
- Once on a week long ski trip in Kokanee Glacier National Park, one of the women started her period early. She was two weeks early, so she was in a bad way. We made a game of creating pads from the very sparse inventory of materials. It worked. And think of this...you could be a savior in case of a normal emergency. See “HINTS”
-
- SIGNALING DEVISES
- A whistle, canned air horn, or a mirror work well.
- SUN TAN LOTION & SUN PROTECTION
- Make
- sure your sun tan lotion is always fresh, and close at hand. I prefer a large sun hat like Sunday Afternoon, Solaris, or Sun Blocker. 100% UVA/UVB/IRA sun glasses are wise. If you spend time on snow, side and nose shades on sun glasses will protect your eyes and nose from reflected rays. Snow blindness is a very serious affliction while out. See”HINTS”.
Benefits Franklin once said…
“IF YOU FAIL TO PLAN, YOU ARE PLANNING TO FAIL”
WAYS TO TELL DIRECTIONS
NORTH STAR
At night, if the sky’s are clear, locate the Big Dipper. Go to the cup of the dipper, and find the two stars furthest away from the handle. From the bottom star, draw a line up past the upper star. Continue up to the Little Dipper. The first star is the North Star.
SUN AND STICK METHOD
If the sun is out, pound a stick in the dirt/snow, and place a marker at the top of the stick’s shadow.
Wait 15+ minutes and place a marker at the top of the sticks shadow.
Draw a line from one marker to the next. These two markers are west on the left to east on the right.
Now draw a line perpendicular to the west-east line. North is above, and south is below.
USING A WATCH
If you have a digital watch, pretend it’s a dial watch.
Place the hour hand at the sun.
Go to the minute hand, and then find a line between the two hands.
South is half way between the two hands, and north is in the opposite direction.
FLOATING MAGNETIC METAL
First, find a pond or even a cup of water.
Next take a small paper clip and rub it on another larger piece of metal, to magnetize the paper clip.
Set the paper clip on a leaf, styrofoam, small wood block.
Let it set for a while, out of the wind.
The paper clip will eventually point to magnetic north.
Know the area you are in, and observe the True North from the Magnetic North.
Or to make all this easy….dig out your compass. It will never fail you.
I have, attached to my pack strap a small thermometer and compass, for easy access.
However, the compass arm may be affected by any magnetized metal close by.
Isolate the small compass to determine what way is north.
ARE YOU DIRECTIONALLY CHALLENGED.
A few people have the ability know what direction north is at the drop of a hat. But most don’t.
An easy way to instantly find the North Pole, is to train yourself and your hiking/skiing partner, way before you head out into Nature.
Do this, by often asking your partner to point to the north. Or east, west, or south.
When you ask your partner what direction is east is, for instance, your partner should point to the direction without too much thot.
This method should be practiced often, so you know your partner can tell direction.
GOOGLE EARTH
As a backup, I screenshot images of my route both vertical and horizontal. By using two fingers on the screen, pull down, and the perspective will be horizontal.
Write notes on your phone for reference in the route and turns you need to take.
The more info and maps each person has, increases the odds on surviving a separation or being lost, I mean unfound. I try never to be lost. I said tried!
CLOTHING
Clothing is a critical issue for anyone going into nature. If you don’t dress appropriately, you will pay a price. The following information is meant to show you the best, least expensive way of dressing yourself for success on the trail.
First and MOST IMPORTANT...”COTTON KILLS” in the mountains. I love my soft cotton shirts and other clothing while around the house or town, but I never wear cotton in the mountains. Cotton tends to soak up sweat as you work thru tough hikes. Then you are wet. If the weather changes or you go deep into the woods, your bodies core temps can drop to dangerous levels.
Below are some suggestions that have worked for me over the last many decades. They may or may not work for you. And that’s okay.
BASE LAYERS
The base layer is worn next to your skin, and is designed to wick any moisture away from your body.
There are so many options when choosing a base layer. The way you decide, is to try a brand out. If it works, buy it. If it doesn’t, keep researching options until you find a product that works for you.
All major manufactures make state of the art base layers. But that isn’t to say they are the best for you.
For those wanting warmth and wicking capabilities, I’d suggest Indera Two Layer Pro, SEE BOTTOM.
I’ve skied for 64 years and have found nothing to match the Indera Two Layer tops and bottoms. The inside is polypropylene, while the outer layer is Moreno wool.
If I have one gripe about the Indera, it is that the waist band deteriorates after a lot of washing. But for about 22$ per piece, it’s a great buy and works well.
To repair the waist band, fold a small amount together on both sides, while wearing them. Once they feel snug, take them off and sew the folds together.
I always buy a size larger than needed. That wise, it creates more loft. More loft means warmer bodies.
THERMO LAYER
The next layer is the thermo layer. The thermo layer is designed to keep you warm. They come in weights like 200 grams or higher. The thicker the fleece weight, the warmer the garment. For those on a budget, look for an off brand within your budget.
In late fall or winter, the mountain temperatures can get chilly. I always carry my down jacket for breaks, lunch or any time I’m cold.
OUTER LAYER
Your outer layer is designed to not necessarily only keep you warm, but dry.
Do not scrimp on your outer layer. They should have features like a hood with a draw string to fit your head snuggly, removable hood, and a small sun visor. Other important features are a powder skirt to keep the snow out, pit zips to cool our self ( the larger the better), easy open and close pockets, and completely waterproof. Look below for washing and treating.
WOOL
Wool has been used by people for centuries. It’s biggest plus, is when it’s wet, it’s still warm. Secondly, it very inexpensive, as apposed to the high tech fabrics. Don’t disregard the importance of wool.
PREASURE BREATHING
Pressure breathing is a way of breathing that allows more oxygen into your blood stream. As you are approaching a steeper section of a trail, inhale deeply. Then purse your lips like you would do if you were blowing out a candle at arms length. Blow steadily thru your restricted lips. By the time you reach the summit, you will understand why pressure breathing is important to know. In the winter, it makes you feel warmer.
On lower angle slopes, you don't need to restrict your exhale as much as on steep slopes. Change your exhale to meet your circumstances.
CAMERA
A camera with fully charged batteries and lots of memory, can be a useful tool. I have used my camera to shoot back at trail intersections or Y’s to make sure I don’t miss key turn offs, upon returning.
I also carry a dozen 18” lengths of bright pink surveyors tape. I loop the tape over a branch, then pull the ends thru th loop. This allows me to easily retrieve the tape as I walk past it. Do not tie the tape. Future hikers may think its the way to go. and it may not apply to them.
Also, if you are going off trail, take an image of the direction and area you are headed. Once you get way over there, it just doesn’t look like it did from way back there. An image may be useful in choosing the route you need to go.
I use screen shots of goggle maps. I draw the proposed route, and use them to understand my surroundings in the field.
You can shoot vertical and horizontal images of the route, and refer to them on your phone.
Having said this...DO NOT FAIL TO TAKE A FOREST MAP & TOPO MAP, AND A FMPASS, ON EACH TRIP. BATTERIES DIE.
RESPONSIBLE PERSON
Tell your responsible person where you are going & when to call the sheriff if you are overdue. If you change your destination, make sure your responsible person knows where your new destination is. If you don’t, you run the chance of not being found in a timely manor.
And make sure your call or text to your responsible person is received.
We have included on each trip write up, the Sheriff’s phone numbers for that particular hike.
And please remember, if you call a sheriffs office, they may ask for a photo of the person. The picture needs to be a face on shot, without glasses or hats.
The reason you call the sheriff is in case of an EMERGENCY. Please don’t waste their time and resources, if it’s not an emergency.
MISCELLANEOUS
BUGS AND INSECTS
While on backpacking trip or around a campfire, you can find old rotting wood (from long downed and rotting trees), and set them smoldering.
Place these chunks of wood on rocks around your area to repel bugs and insects.
BE EXTRA CAREFUL NOT TO IGNITE SURROUNDING DRY FUEL.
HEADLIGHT
-Types of headlights. Now a days, we have LED and LCD headlamps to show our way. There is, however, a new type of headlight to consider. A (Circuit On Board) COB headlamp, scatters the light and allows for more depth of field as you walk. I carry one of each with extra batteries, on every outing.
THIS IS MY OPINION. YOU MAY NOT AGREE, AND THATS OKAY.
What would you do, if you were on an extended hike, and it gets dark, and your batteries die. Obviously, you would replace them.
But many outlets and online stores are selling rechargeable headlights.
What do you do if the lithium batteries die?
I know a lot of you are younger hikers, and use electronics in the woods.
Like electronic compasses, rechargeable headlights are not your only option.
Old school items tend not to be a better choice. You can change out the batteries.
FIRST AID
-First Aid Kit are a must for EVERY participant. If you get separated from your group and gouge you leg, you will need your own FIRST AID KIT. They should include a variety of band-aids, compression bandages, antiseptic creams, butterfly bandages, alcohol wipes, gauze wraps, Conan wraps, hand sanitizer, and feminine hygiene pads (even if you are a guy), to name a few, are a must.
“SPENCO 2nd SKINS BURN PADS” by Spenco are a must. If a heel feels hot, STOP Immediately, clean the area with an alcohol wipe and apply a Second Skin Burn Pad. I prefer the type you have to cut to size, as apposed to the patches. After cleaning the area, cut to size and apply as directed. I carry athletic tape to secure the 2nd Skins. You will be amazed at how well this product works, and your ability to get up and walk away without pain. I also carry several different types of Coban’s self adhesive wraps for a verity of needs. I found a long version at the Dollar Tree store fir $1.25.
Whatever you decide to carry, practice placement and proper cleanliness, so you know how to properly treat an injury.
Im not a fan of Ace bandages. If they are applied too tight, you could restrict blood flow.
PLEASE don’t stab yourself at home to make it real!
It is imperative to change out old or used supplies for new items. Nothing is more frustrating than to need an item you are out of. If anything gets wet or dirty, toss it out and resupply your First Aid Kit. Always pick up your bandage papers and wipes before you leave the area.
After stabilizing a victim, do a care analysis of the victim. Ask where their pain is, it’s intensity level, and visually examine.
A good rule of thumb is D.O.T.S.
D- DEFORMATION of extremities, spine, neck, hips, arms and legs.
O-OPEN WOUNDS. Trea for bleeding immediately. Other than a pulse and breathe in, controlling bleeding is essential..
T-TENDERNESS. Check the victim very carefully. Examine any areas of tenderness for additional injuries.
S-SWEELING. While checking for tenderness, take note of any area that shows any degree of swelling.
There is an online CPR and First Aid Course, you can take.
Log onto…..cprandfirstaid.net
The more you know, could just save a life.
METHODS TO START A FIRE
Always carry waterproof matches, extra lighters.
The more you have with you, the better off you will be, in case of an emergency
There are waterproof, windproof, lighters that will work in altitude.
Of these, there are some that are rechargeable.
They are great because they done use fuel. However, batteries die.
If you rely on these, carry a power stick to recharge as needed.
So always have a many lighters or other forms of fire starters as back ups.
I always carry several ziplock bags with folded paper towels, for many uses.
The most important is of course, toilet paper.
The next important reason is to use the paper towels to start the fire with.
WINTER AND COLD TEMPS
If you recreate in cold weather, including winter, you will be wise to carry a road flair or two.
They burn at about 1500° or more, and can start even wet wood on fire.
TINDER
In Nature there is a lot of flammable stuff to find and use to start your fire. All must be dryish.
Pine Needles
River Birch bark
Cattails….twist the cattail to expose the the stringy fibers inside
Most any thistle. But be ware, thistles are a pain
Cedar Bark, cut up or scrape for fine fire strarter
Dried orange peels
Potato and/or corn chips
Most all tree bark
Dry grasses
Beard Lichen is the dry stringy material that hangs down off of tree limbs
MAKING TINDER
Everyone should have a knife with them. Hold the knife perpendicular to a stick of wood, and shave downward, but not off the stick. This will make a bundle of shavings that will be easier to on fire.
Using your knife, shave a stick like you do to when sharpen a pencil. Gather the shavings and place them near where you want to start the fire.
Continue slicing any wood you find into several different sizes of tinder.
The more you make, the better
Build a log cabin style of tinder, that you can add the first small burning tinder to.
HOW TO BUILD A FIRE STRUCTURE
There are several ways to build your fire structure.
Gather a lot of different sizes of tinder and fire wood, and place them near the spot you want to build your fire.
A TEPEE STRUCTURE
Start by placing the small dry tinder in a mound.
Some dry leaves can be place between your hands. Rub your hands together with the leaves in them. Soon you will have a lot of small dry tinder to use.
Then stack slightly larger tinder in the shape of a tepee. Leave a small hole near the base of the tepee, to place the burning tinder in.
Add larger sticks to the outside of the tepee until you have a lot of wood around the tepee.
Be sure to leave enough space in the wood structure to allow proper air flow.
When you have gathered a lot of material to burn, light your small tinder on fire and place it inside the tepee.
Add larger tinder and wood as the fire starts burning the tepee.
LOG CABIN STRUCTURE
As the title suggest, build a log cabin of medium size tinder.
Then do all the steps above in the TEPEE STRUCTURE.
A RAFT STRUCTURE
Build a square or rectangular structure out of any material laying around. The structure can be made of rocks.
The advantage of using rocks, is they get hot and radiate heat.
Then do all the steps above in the TEPEE STRUCTURE.
Store bought and homemade fire starters
Vaseline and cotton or lint. Mix together in a bowl, but make sure some cotton or lint isn’t saturated with Vaseline.
Pack tightly in a light weight can.
Twine can be spooled and use to start fires.
A 9 volt battery and steel wool. Have your tinder built and ready. When the steel wool starts to burn, get it to the tinder fast.
A magnifying glass can be used to start a fire, as well as reading small print on a map, or used to remove splinters.
In an egg carton, pack each indentation with dryer lint. Then light a candle and drip the hot wax onto the lint. Mix together and let set up. Pop them out of the egg carton and store in a ziplock, inside a small can.
A BOW FIRE HAND DRILL
Items you will need.Twine, rope, or shoe lace
Knife 6"
Find a 2" diameter bowed (arched) shape branch about 2-3 feet long. Tie the cord to each end to look like a bow (bow & Arrow).
Find a dry 2' diameter stick, and carve one end into a point.
Find a piece of wood that you can split with your knife, and dig a 1' diameter divot into the the wood close to the edge, then cut a slot out of the edge.
Wrap the cord around the pointed stick, and place the pointed stick into the divot.
Have ready some small dry kindling, atop a piece of dry wood.
Place the upper part of the stick against your knee for stability.
Use the bow to rotate the stick in the hole. Soon the pointed stick will start to smolder. Blow on the smoldering wood to fan the fire.
Once the kindling starts to burn, sweep it off onto the kindling. Blow on it to fan the flames.
This method may take some time if you can"t find dry wood.
If the tree branches around you have stringy moss hanging off the branches, use it as kindling.
OTHER METHODS
There are commercial fire pastes, fire sticks that look like fat matches with strickers.
Make up a small tin of dryer lint saturated with vaseline
On winter hikes, take a road flare. They burn at 1500° or more, and can start wet wood on fire.
I always carry several ziplock bags for table napkins, paper hand towels, toilet paper, etc. They can be used for many needs.
You can use the 6" knife and a small 16", 3" diameter branch to chop wood.
Place some wood on a rock vertically, and your knife blade down on top of the wood.
Holding your knife steady, use the branch to pound the knife down thru the wood. The smaller the kindling the easier to start.
As stated above, if the tree branches have stringy lichen hanging from its branches, called Beard Lichen , collect a lot of it to use as "kindling" starter.
You also can pull bark off a tree, and use the driest wood inside as starter.
Use your imagination to create and carry what you may need in an emergency.
Start by sticking a long piece of kindling into the ground above your tinder at about a 30-degree angle, with the other end of the stick pointing into the wind. Then lean smaller pieces of kindling against both sides of the longer piece to build a tent. As the kindling catches fire add more kindling, followed by your firewood.
A log cabin design, pyramid, teepee, and a lean-to, is a good structure to build a fire.
USING WATER TO START A FIRE
Another method of making fire, is to use water. What you say? How can I use water to make a fire?
I always carry an assortment of ziplock bags in my pack, for multiple uses.
Fill a ziplock about 1/3rd full of water, and twist the ziplock so the water is in a corner of the baggie.
Collect an assortment of twigs, Beard Lichen, and any other flammable material, and create a teepee, lean-to, or log cabin design of tinder.
Hold the water filled baggie above the tinder, and let the sun magnify the heat that is created.
Soon the light tinder will start to burn. Place the burning material under your tinder, and you have fire.
USING A WATER BOTTLE TO START A FIRE
If you have a clear water bottle, fill it to the brim and cap it.
As the sun shines thru the bottle, notice an area opposite the sun that is bright white on the ground.
Tip the bottle to maximize the amount of area the sun shines on.
Use whatever tinder is available, by stacking it up. Have several different sizes of tinder available so you can add to the tinder once it starts on fire.
Once tinder starts to burn, add the next smallest size tinder. Then add larger size tinder until you have a fire.
FLINT AND STEEL STRIKERS
Flint and Steel strikers work very well to start fires. before you go out on a hike, practice how to use them.
Use an eye glass lens and the sun to start a fire.
FIRE STARTER
Listed below are types of fire starters, but the following can help getting damp or wet woods to light. In a forest, there usually is the light green or black stringy moss that hangs from tree branches, called Beard Lichen. Not only does it make a good fire starter, it can be used like a sponge to collect water.
Solid fuel fire starter. Some look like thick matches.
Magnesium Fire Strikers do well if they are dry.
Fire Starter Pastes are another option.
PACK IT IN- PACK IT OUT.
The USFS does not have the staff or time to clean up the many trails and campsites within their districts. Please clean up after yourself and others if needed. And please remember, aluminum foil and glass DO NOT BURN. Please pack them out.
-An old saying goes...”if you can carry it in full, you can certainly carry it out empty.”
LEAVE NO TRACE.
As states and the USFS don’t have the staff to clean up after you. Please clean up your, and others messes.
Leave No Trace principles can be learned from any Forest Ranger Station.
FREEZE DRIED FOOD MANUFACTURERS
On a recent trip up near Priest Lake, we noticed that if you let the pouch sit for over 15 minutes, the freeze dried meals taste much better.
The following are companies that make freeze dried meals for hiking and backpacking, with a twist.
I would like to invite you to tell us about your experience and taste of the foods listed below. Contact Chic thru this website.
Recently we realized that after you pour your boiling water into the food pouch, seal it and let it sit for about for a total of 20+ minutes.
This tends to soften the freeze dried food more and mixes the flavors better
heather’s choice.com
bushkaskitchen.com
fernwehfoodco.com
gourmetkickz.com
heatherschoice.com
nomadnutrition.co
outdoorherbivore.com
packitgourmet.com
trailtopia.com
mountainhouse.com
maryjanesfarms
backpackerspantry.com
patagoniaprovisions.com
rightontrek.com/meals/store
If you have any suggestions on the above topics, please use our contact form. When I include it in this section, I will credit you for your advise.
Click to set custom HTML