Bears in the forests are always a concern. A friend in McCall sent me this link, that I feel is important for all to know before you go out into Nature. Even tho it was written by a group in Canada, I feel the info also applies to outdoor travel in Idaho, Washington, and Montana. At the bottom, I will add my own method of letting bears, and other critters know of my presents.
Bear Safety in Canada & U.S.A.: What You Need to Know Canada’s untamed natural beauty is (rightfully) world famous. And so are the majestic bears that call it home. Learning some basic bear safety is absolutely essential for anyone planning to explore beyond the city streets. While bear attacks remain incredibly rare – you’re actually more likely to be hit by lightning – it is crucial to know how to avoid a negative encounter and what to do in the very unlikely event it does happen. This guide will cover essential bear safety tips to help you feel confident to explore the great outdoors, whether you’re visiting Canada for the first time or a long time resident venturing out of the city. Published November 2020. This post includes affiliate links. If you make a purchase through one of these links, I may receive a small percentage at no extra cost to you.
Bear safety basics It’s totally normal to be frightened at the prospect of encountering a bear, especially if you’re new to Canada or outdoor activities.
I grew up in a place where the most dangerous creature is a rarely seen snake. So I get it. It took me a long time to get over late night tent paranoia, where every rustle and crunch sounds like a bear! Now, I’m deeply fascinated by bears and always hope to see one from a safe distance. I do, however, do everything I can do minimise the case of seeing a bear at close range. Having some fear of bears is healthy (these animals deserve our respect), but it shouldn’t stop you from exploring the outdoors. The best way to reduce this fear is to learn the basics of bear safety – exactly the purpose of this guide!
Knowledge is power What has helped me become more comfortable when exploring bear country is knowledge. These are the facts that have helped me:
Bears prefer to avoid people
Humans are NOT on the menu – bears are actually mostly vegetarian!
The vast majority of bear encounters are a positive experience
There are ways to proactively avoid encountering a bear
When used properly, bear spray is extremely effective.
Identifying bears This guide will cover how to avoid bear encounters and what to do if you see a bear. To start, let’s talk about the different types of bears that live in Canada.
Black bears are the most commonly seen bear in Canada, living in every province and territory
Grizzly bears (also known as brown bears) are found in Northwestern Canada, with most located in the coast and mountain regions of British Columbia, Alberta and Yukon Territory
The Kermode (or ‘spirit’) bear is a famous subspecies of black bear with beautiful white fur. They live around the northern and central coast region of British Columbia
Two thirds (around 16,000) of the world’s polar bear population are found in northern ice-covered regions of Canada
I’ll be concentrating on bear safety concerning black and grizzly bears, as they are the two most commonly found bears in Canada.
How to tell black and grizzly bears apart Black and grizzly bears have varying diets, preferred habitat and physical features. Most important when considering bear safety, they also have different behavior and defensive techniques. But telling them apart isn’t always easy. Size is not a reliable factor. The average weight of an adult grizzly is usually heavier than the black bear equivalent but bears do come in all shapes and sizes, however. An adult black bear, for example, can appear a lot larger than an adolescent grizzly (less than 5 years old). Color is also not as clear cut as it may seem. For one thing, bears are not always black! Both black and grizzly bears can vary in shade from blonde (light brown) to very dark brown/black. Black bears Usually found in forested and coastal habitats Excellent climbers – black bears more likely to climb a tree to escape a threat Natural response to threats is to retreat Flatter, fairly straight face profile with prominent ears No shoulder hump Shorter, dark colored claws Front toes form an arc Grizzly bears Prefers open habitats such as meadows, alpine forest, coast Less adapted for climbing (but will) More likely to defend themselves Dish shaped snout and face profile, rounded ears Shoulder hump Longer, lighter colored claws Front toes are in a straighter line
The primary diet of both grizzly and black bears is plants, berries and insects. Bears are, however, opportunistic and will eat carrion (already dead animals). Coastal bears will feast on salmon in the autumn. Grizzlies are more likely to hunt small mammals as prey.
BearSmart has an excellent quiz designed to test you on the visual differences between grizzly and black bears. I highly recommend having a go!
How to avoid a negative bear encounter The best way to stay safe around bears is to proactively avoid negative bear encounters. Follow these tips:
Research your destination first. Find out about the local wildlife. Check for any restrictions or recommended safety precautions
Read and follow all trailhead signage. Respect trail closures and wildlife warnings.
Make noise in the backcountry. More info below
Remain alert at all times. Watch for fresh bear signs like tracks, diggings and scat (bear droppings)
Stay on the trail and traveling in daylight – bears are most active at dawn and dusk
Avoid animal carcasses. Wildlife, bears included, are attracted to dead animals
Keep pets on a leash. Dogs can provoke defensive behavior in bears
Pack out everything you bring with you, including all garbage and biodegradable items such as apple cores and bananas peels
Travel in a group. The larger the group, the fewer recorded attacks
Store food safely when camping. Bears are curious and will inspect odors to see if they’re edible
Learn about bear behavior. Being able to interpret their postures and vocalizations can be incredibly helpful
Know how to respond during an encounter or attack
Carry bear spray.
Making noise on the trail Just as you may not want to meet a bear on a hiking trail, bears don’t really like to encounter humans either!
Y Bears have good hearing and are thought to associate voices with humans. If they hear you, they will usually avoid you.
The easiest way to alert any potential bear of your presence is to call, sing, clap or talk loudly
Talking or singing loudly may make you feel a little silly at first, but it is a tried and tested method for avoiding bear encounters
Increase the volume when it may be more difficult to hear – on windy days or close to streams and dense vegetation
It’s a good idea to be especially vocal in areas with low visibility. Don’t surprise a bear when coming around a blind corner! Oh, by the way, it’s a myth that bears can’t see well
Bear spray Bear spray is an aerosol deterrent made with chili pepper oil. It’s designed to be deployed at close range (less than 10m) towards the face of an aggressive or charging bear. It causes the eyes, nose and lungs of a bear to swell, restricting their breathing and sight. In most cases, the bear will then retreat. This allows the user to leave the area safely. Bear spray is a ‘last resort’ tool, used only when other methods have failed. When deploying bear spray, you use the entire 225g cannister. It empties in around 7-9 seconds. Some studies have shown that bear spray is more effective than shooting a bear with a gun. There has been further debate regarding the truth of this, however, but the fact remains that bear spray is the one of best defenses the average person can have against an aggressive bear. When carrying bear spray, you should have it stored in an easily accessible place and know how to use it. If the occasion arises, you want to be able to deploy it fast.
What to do if you see a bear In the event you see a bear:
Stop
Stay calm
Have your bear spray ready (take the safety off)
If in a group, stay together
Never:
Run
Drop your bag
Scream
Make sudden movements
Turn your back on the bear
Block the bear’s escape route
Always remember that bears are stronger and faster than you. Bears can see well (especially at night) and their hearing is twice as good as ours. They generally do not want to attack you, however. If the bear is in the distance
Do not approach
Give the bear plenty of space
If the bear is moving, wait at a safe distance
If you can, make a wide detour around the bear
Move slowly away without getting it’s attention
Be prepared to turn around and go back the way you came if necessary
If the bear is close If the bear was surprised or has cubs/food, it is likely to react defensively. It may appear stressed or agitated (swatting the ground, blowing, snorting). A defensive reaction is most common. A non-defensive bear could be curious, looking for human food, testing its dominance or in very rare cases, predatory. The bear’s attention would be clearly directed at you with head and ears up. Standing up on its hind legs is a sign of curiosity (the bear is using it’s senses to identify you). How to respond to a defensive bear
Remain still and calm
Talk in a soothing voice
Start backing away
Avoid eye contact
If the bear approaches, stand your ground and prepare to use bear spray
If the bear makes contact, drop to the ground and play dead. Cover your neck and the back of your head with your hands
Most defensive attacks last two minutes or less. Remain still afterwards and wait for the bear to leave the area
If the attack doesn’t stop, fight back
How to respond to a non-defensive bear
Remain calm
Talk in a firm voice
Move out of the bear’s way
If the bear follows, stand your ground and switch to aggressive behavior
Look the bear in the eyes, shout, stamp your feet, make yourself look bigger, hit it with whatever you have, take a step towards the bear
If the bear still approaches, use your bear spray and fight back
Concentrate your attack on the bear’s face (nose, and eyes specifically)
How to camp safely Anything that has an odour can attract wildlife. Avoid inviting a bear or other wild animal to your campsite with the following tips! Frontcountry camping Also known as ‘car camping,’ this style of camping is accessible by vehicle. A front-country campground usually has facilities including (but not limited to) allocated campsites, water, outhouses (or flush toilets), trash bins and even showers. The easiest way to be ‘bear-safe’ at a frontcountry campground is to think ‘bare’! Your campsite should look almost empty when you’re not there, with only camping furniture left (tent, chairs etc).
First, research the campground you are planning to go. Are there any restrictions or recommendations relating to bear or other wildlife activity?
Store all food, food related items and toiletries in a hard-sided vehicle (RV, car, van) when not in use. This includes cooking equipment, garbage, dishes, coolers, drink containers etc.
Campers without a hard-sided vehicle (such as cyclists) should be prepared to hang their food if storage lockers are not provided. More information in the ‘backcountry camping’ section below
Do not leave pets unattended. They can attract coyotes and wolves as well as bears! Pet bowls and food should be stored securely too
Keep your campsite clean. Wash dishes soon after eating, wipe up any food spills, pick up food scraps and dispose of any garbage in the provided bins
Backcountry camping A backcountry campsite is one situated in a wilderness area, only be accessed by foot, bike, horse, boat or plane. Facilities are limited.
First, research the backcountry area you are planning to go. Are there any restrictions or recommendations relating to bear or other wildlife activity? Is food storage provided?
If you’re not staying in an established backcountry campground, pick your tent spot carefully. Avoid berry patches, game trails or thick brush. Look for animal carcasses nearby
Don’t cook or eat where you sleep! If there is a designated cooking shelter or cooking area, use it. If not, head at least 50m (preferably 100m) downwind from your tent
Disperse graywater properly. Strain food particles with a metal screen and add them to your garbage bag. For the graywater itself, use the disposal pit (if provided) or bury/scatter away from water sources
Clean up thoroughly after cooking, being sure to pick up all garbage, food scraps and crumbs (even if ‘biodegradable’!)
Never burn garbage or food in a campfire. The smell can linger and attract bears
Keep your sleeping bag, tent and sleeping clothes away from the food preparation area. Clothes with spilled food on them should be stored with other smelly items (see below)
Storing food in the backcountry When backcountry camping, one of the most important aspects of bear safety is storing food and smelly items properly. When not in use, food, toiletries, cooking equipment and garbage should be stored securely, away from your tent.
Some established backcountry sites will have a food cache (a metal bear-proof container) or bear pole system
Be prepared to create a bear hang, in the situation there is no food storage system provided at the campground (or it is unusable). You’ll need a carabiner, dry/stuff sack and at least 15m (50 feet) of nylon cord
Alternative solutions include the Ursack (a lightweight, collapsible puncture-resistant bear bag) or a bear barrel/canister. The latter is thick plastic container with a bear-resistant lid
Safe roadside bear viewing The most common way to see a bear in Canada is from your vehicle. Seeing a bear by the road is always exciting but the experience can hazardous for both you and the bear. Here are some tips:
Consider not stopping at all. Undisturbed bears are able to forage more successfully, enabling them to build up needed fat reserves
Driving by slowly (when safe to do so) is the next best way to minimise your impact
If you decide to stop, pull off the road safely without blocking other traffic
Stay a respectful distance away from the bear and make sure it has an escape route
Do not leave your vehicle!
Remain aware of other vehicles – move on if the situation becomes crowded
Keep your observation time short
Bear safety essentials Bear spray, as you may guess, is an absolute given. JR and I carry one canister each. Some may say this is overkill but I like having a back-up. Bear spray should be stored somewhere with convenient access. We personally use holsters to secure the bear spray to our hip, using a belt. When I’m wearing leggings, I often wear a waist belt and attach the bear spray to that. To buy bear spray, head for an outdoor gear store. I love to support local when I can, but you can also reliably find bear spray at MEC, Canadian Tire, Cabela’s etc. When you purchase bear spray in Canada, you’ll need to sign a waiver to assume all risk when using. The propellant in bear spray loses its potency over time – brand new bear spray will typically expire after 2 to 2.5 years. If you’re visiting Canada from an international destination, be aware that you cannot bring bear spray onto a plane. So you can’t bring it with you nor take it home. Some outdoor stores (especially around Banff) rent bear spray.
We also sometimes bring a mini air horn. It delivers a shockingly loud sound that would startle any nearby bear. It could also be used to send a distress signal if needed.
Bear encounters: my experience One question we get asked a lot about our outdoor adventures is ‘how many bears do you see?’ The truth probably sounds pretty boring – not many. And that’s OK with me. Don’t get me wrong; bears are beautiful, extraordinary creatures. It’s an incredible experience to be able to see them from an appropriate distance. Each year, JR and I hike around 500-700km in Western Canada. We have only ever seen one bear while hiking a trail. Yes, really! And even then, we saw just the back end of this black bear as it ran away. This was on the Della Falls Trail in Strathcona Park on Vancouver Island, BC, back in 2016. In October 2019, we had three different (close-contact) bear encounters:
Arriving into the Cape Scott parking lot after an overnight 34km backpacking trip, we found a black bear standing about 20m from our vehicle
Walking a friend’s dog in a local park in Courtenay, I noticed two black bears sitting in a tree. There was a river nearby, filled with salmon
While returning to our vehicle after attempting to harvest oysters in Nanoose Bay, a black bear was walking towards us on the path. We were about 600m from our parking spot
The thing that all these experiences have in common (besides being on Vancouver Island!), is that we were not in a wilderness setting. Cape Scott is reasonably remote but when we saw the bear, we were in a ‘developed’ area of the park, somewhere that anyone with a vehicle could access. Bear encounters are uncommon, and dangerous ones even rarer. But bears live and travel closer to humans than you may expect. This is why bear awareness is so important. And also the reason why I carry bear spray on all trails, even short ones! Preparation, proactive avoidance and knowledge are key when it comes to bear safety. Never be complacent.
Chic’s comments Some things I do when I’m hiking in Idaho, Montana, or Washington, is to call out “HEY BEAR” or “OIYA OSO”. That’s Spanish for hey bear. Some people get freaked out when you yell hey bear. By saying it in Spanish, it isn’t as intimidating. If you carry hiking poles, smack them together. That loud noise will alert bears of your presents.
When I yell OIYA OSO, I also whistle. If you can’t whistle naturally, use a plastic whistle. Be loud and aggressive long before you encounter a bear. As you walk over a ridge, or into a creek bed with water flowing, YELL LOUD. Don’t be shy.
MAKE LOUD NOISES ALL DAY LONG.
RATTLESNAKES First know that they are not aggressive. However, if you get in their face, they will react. I’ve hiked in the Washington Scablands for decades, and saw my first one a few years ago on a hike with Tyler and Galen. We came to a fence that we had to climb over, and I threw my pack over the fence, onto a rattler. My pack died a slow death. Just kidding. When you are walking in the Scabs, and you hear their tails rattling, they are telling you to get away from them. If you do not heed their warning, they will strike, if you are close enough. A rattlesnake can strike a distance of half its length, or about 18 inches. If they are far enough away, observe them. They also are incredible critters. All snakes are cold blooded. That means they don’t produce their own heat like we do. So, every morning they come out in the sun to warm. Look for them on the south face of rocks, logs, and brush. When walking, don’t blindly step over objects. Look first. If you or another hiker is bitten, get them to a hospital as fast as you can. DO NOT CUT OR WIDEN A SNAKE BITE. AND DO NOT SUCK THE VENOM OUT. Try to memorize what markings the snake has. Then be sure to tell medical personnel your description. By doing so, the medical folks can access the proper antidote, without having to test the victim. Note the time of the strike, so medical personnel can follow the progression of the symptoms. It is very difficult and dangerous to use a tourniquet. If you do, release the tourniquet for 30 second, every 15 minutes. By not releasing the tourniquet, you take the chance of gangrene setting in. And possibly having to amputate the effected area.
If you are still scared of hiking in the Scabs, there is an aid to prevent getting bite. There are plastic leg wraps that snakes can’t penetrate. Rattlers don’t strike real high, so they fit below the knees.
The Washington Scablands hold so many very cool places to hike, you should not miss their attractions.
POISON IVY Poison Ivy is a plant you should not touch. And if you do, do not touch yourself or others, PERIOD. I’M VERY SERIOUS HERE. DO NOT TOUCH ANYTHING. Poison Ivy grows along the base of cliffs, rocks and can extend out from them. Their stems grow to about 12-16 inches, and have three leaves that droop down around their stem. The only way you can tell they are dangerous to touch, is to touch one. You will never forget them after that. If you touch them, and later have to pee, you will regret it for a long time.
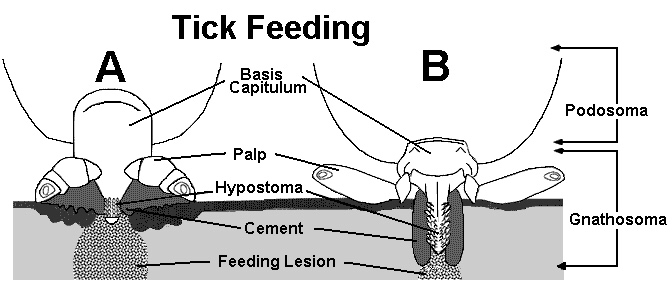
TICKS SEE BOTOM FOR ILLUSTRATIONS Wood ticks are a hazard that fortunately move very slow. They tend to congregate near belts, collars, restricted areas. When they dig in, they use a pain killer in their saliva to not alert you. When you find one in you, use a set of tweezers to grasp the largest part of their heads crossways ( from left to right) and pull out slowly and carefully. DO NOT THROW AWAY. SAVE THEM FOR YOUR DOCTORS TO EXAMINE FOR DESEASE. Inspect it for missing legs or other parts that may have broken off in you. If you suspect parts are in you, use your fingernail, knife or other instrument to dig it out. Usually the parts are not deep. In your first aid kit, carry biodegradable soap and a antiseptic lotion to treat your dig site. Monitor your dig site carefully. Also in my essentials kit is a small light weight plastic magnifying glass to inspect wounds and look for tick body parts. Ticks are really cool critters. You cannot kill them with your bare hands unless they are engorged with blood. All this can be used to remove splinters. Splinters can infect easily if not properly treated.
There are several effective prevention items.
Any DEET sprays work very well. Oil of eucalyptus Oils of Cedar with Witch Hazel And the newest product is Permethrin.
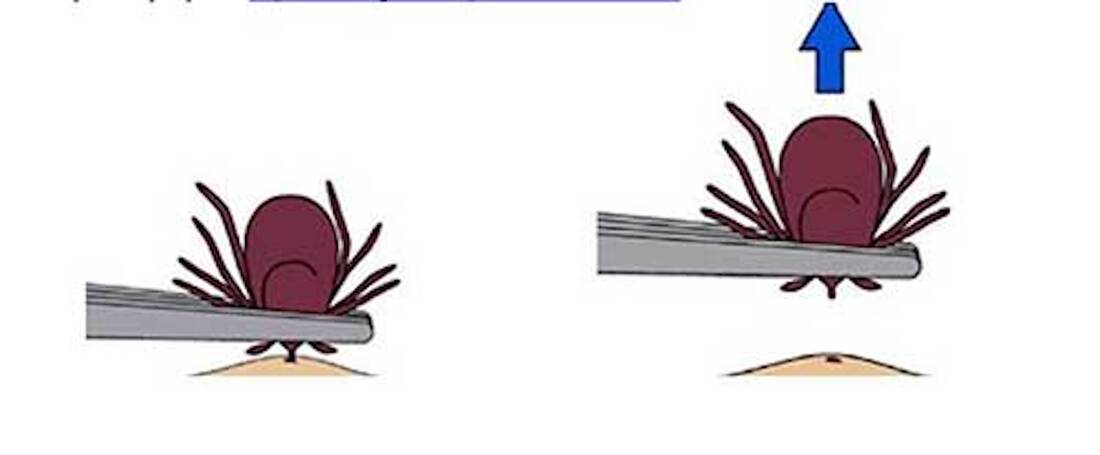
TICK PREVENTION STARTS BY COVERING UP Minimizing your exposure to ticks begins with your clothing.Ticks tend to latch on in grassy areas above the cuff of your pant-leg and move upward, looking for dark places to burrow. Here are a few tips for hikers: • Wear pants and long sleeves -- no shorts! The best choice is convertible pants with a flap over the zippered legs -- this is an excellent tick trap. • Tuck your shirt into your pants. Tuck your pants into your socks. • Wear light colors, so you can identify the ticks more easily as they climb. • Don a cap with a flap behind the neck, if you have one. There is a lot of discussion about tick repellents. Hikers report that DEET works great for mosquitoes, but not so well for ticks. Permethrin is a better choice for ticks; several brands of clothing are made with Permethrin-infused fabric, or you can buy a spray. Do note that these are pesticides and thoughtfully consider if and how you want to use them. DURING AND AFTER YOUR HIKE Stick to the trail. (I don't believe I just said, 'stick to the trail'. Ticks like to hang out in shaded, grassy areas. Sticking to an established trail is good prevention, but certainly is not fool-proof. This is one more great reason to keep dogs, who are tick-magnets, on leash. Tick check frequently. Hikers in tick country will want to do regular tick checks during the day. Brush those bad boys off or crush them with a fingernail, but don't worry that they are going to burrow in immediately. Ticks like to cruise around for a while before they take a burry their . Post-hike tick check. After your hike you'll want to do a thorough check. One hiker we know changes into a complete set of new clothes back at the trailhead. She puts all of her hiking clothes in a garbage bag and seals it, then does a full body check. Favorite tick burrowing sites include the scalp, waist and other dark places where they can hide. Back home, take a shower. Consider filling up a bathtub or washbasin and tossing in your hiking clothes. Ticks will float up to the surface. Crush them or flush them down the toilet -- note that they can survive a wash and rinse cycle. Check your backpack. Don't forget to give your backpack a full check too. Leave it outside rather bringing it in your home. TICK FIRST-AID: FIVE STEPS TO REMOVE A TICK If a tick has found a place to burrow in on your body, don't panic. While it's possible that the tick has Lyme Disease or Rocky Mountain Spotted Fever, the Pacific Northwest is a "low risk" area for Lyme disease and spotted fever is extremely rare. But don't let that lull you into a sense of security -- you do want to get the tick out completely as soon as possible. • HOW TO CHECK FOR AND REMOVE TICKS ON YOUR DOG • If you hike with a dog in tick country, prevention and tick checks should be a regular part of your routine. • Talk to your vet about preventative medications. • Find out how to do a thorough tick check of your dog and get tips for removal. Follow these five steps for the best way to remove a tick: • • Use an antiseptic or alcohol wipe to clean the area around the tick. • Grasp the tick with tweezers (or fingers) as close to the skin as possible. • Pull straight and steady. Do not twist or yank. You do not want to leave the tick's head and legs under the skin. • If parts do remain under the skin, pinch the skin up and try to scrape the remains away. Use a sterilized needle if you have to dig anything out. • After you finish, use another antiseptic or alcohol wipe to clean the area. • • If you are concerned about disease, save the tick for testing and note the date you found the tick in case you get sick. Watch for symptoms of rash or fever, and if you have concerns, visit your doctor. The Spokane Regional Health District has an excellent one-pager that covers most of the content in this blog. You can also send your ticks to the Washington Department of Health for study.
Tick facts
Ticks are scientifically classified as Arachnida (a classification that includes spiders). The fossil record suggests ticks have been around at least 90 million years.
Most tick bites do not transmit harmful microbes.
There are a variety of tick-borne diseases.
There is a wide range of symptoms that usually develop days to weeks after the tick bite. The symptoms depend on the particular microbe that is transmitted.
For all tick bites, local cleansing and antibiotic cream may be applied.
There are safe and effective methods for the removal of all types of ticks.
Some immediate symptoms that infrequently or rarely develop during or immediately after a tick bite initially may be flu-like and include
Do not be afraid of wood ticks. They move too slow, and take a long time to attach themselves to you. Always wear light colored clothing. Tuck your pant legs into your socks. That way they can’t get to your skin. Most often, ticks are in low vegetation. They crawl up on leaves, grasses, and other vegetation, waiting to snag deer’s hairy legs, or clothes. They have the ability to snag moving objects easily. You can not kill a wood tick with your bare hands. If you find one attached to your skin, DON’T PANIC. get a pair of tweezer out. Work the tweezers down their body to just where they are in your skin. Then do not over squeeze them, but grasp them good and pull straight up. Because they use a glue substance to stay anchored, the extraction will tug on your skin as you pull them out. DO NOT THROW THE TICK AWAY. IF YOU GET TARGET SHAPED RINGS AROUND THE BITE, YOU MAY BE INFECTED. Take a very close look at the head of the tick. If its head, mouth, or leg parts are in tack, you lucked out. Do not throw the tick away. If a leg or mouth part are missing, clean your bite wound out thoroughly. Make sure no body parts are left IN your skin. If there are, and you can’t get them out, see your doctor as soon as possible. DO NOT THROW AN IMBEDDED TICK AWAY. PUT THEM IN A ZIPLOCK BAG OR SECURE CONTAINER. WHEN YOU GET HOME, FREEZE THEM. If your bite site shows a red marks around your bite, in the shape of a target, after a few days, or weeks, take the tick to your doctor, so they can analyze them for any diseases. I have two ticks in my freezer. If nothing shows in one year, I’ll toss them out. As a tick climbs up your skin, they can’t get past your belt, skivvies, or waist bands, or other restrictions. They will climb up to your hair if they can. They do this because on deer, they can’t be easily scratched off. All day long, check your hiking partners clothing to see if they picked one up. I know you will be freaked out if you find one on you. But take a look at these amazing critters. They are so well adapted to what they do, they are cool to look at. Remember, they can take 15-20 minutes to find a vane, and up to 36 hours to imbed themselves. . DO NOT PANIC, THEY ARE VERY SLOW MOVING CRITTERS. Both the ones I have in my freezer, I felt, because I’m hairy. They tend to tickle my fur.
DO NOT SQUEEZE HARD ENOUGH FOR THE TICK TO "VOMIT". KEEP THE TICK....DO NOT DISCARD IT.
Check out this website for more info on ticks. https://extension.entm.purdue.edu/publichealth/insects/tick.html